图像金字塔或特征金字塔是传统CV方法中常用的技巧,例如求取SIFT特征就用到了DoG图像金字塔。但是在Deep Learning统治下的CV detection下,这种方法变得无人问津。一个重要的问题就是计算量巨大。而本文提出了一种仅用少量额外消耗建立特征金字塔的方法,提高了detector的性能。
Pyramid or not? It’s a question.
在DL席卷CV之前,特征大多需要研究人员手工设计,如SIFT/Harr/HoG等。人们在使用这些特征的时候发现,往往需要使用图像金字塔,在multi scale下进行检测,才能得到不错的结果。然而,使用CNN时,由于其本身具有的一定的尺度不变性,大家常常是只在单一scale下(也就是原始图像作为输入),就可以达到不错的结果。不过很多时候参加COCO等竞赛的队伍还是会在TEST的时候使用这项技术,能够取得更好的成绩。但是这样会造成计算时间的巨大开销,TRAIN和TEST的不一致。TRAIN中引入金字塔,内存就会吃紧。所以主流的Fast/Faster RCNN并没有使用金字塔。
换个角度,我们知道在CNN中,输入会逐层处理,经过Conv/Pooling的操作后,不同深度的layer产生的feature map的spatial dimension是不一样的,这就是作者在摘要中提到的“inherent multi-scale pyramidal hierarchy of deep CNN”。不过,还有一个问题,就是深层和浅层的feature map虽然构成了一个feature pyramid,但是它们的语义并不对等:深层layer的feature map有更抽象的语义信息,而浅层feature map有较高的resolution,但是语义信息还是too yong too simple。
SSD做过这方面的探索。但是它采用的方法是从浅层layer引出,又加了一些layer,导致无法reuse high resolution的feature map。我们发现,浅层的high resolution feature map对检测小目标很有用处。
那我们想要怎样呢?
- 高层的low resolution,strong semantic info特征如何和浅层的high resolution,weak semantic info自然地结合?
- 不引入过多的额外计算,最好也只需要用single scale的原始输入。
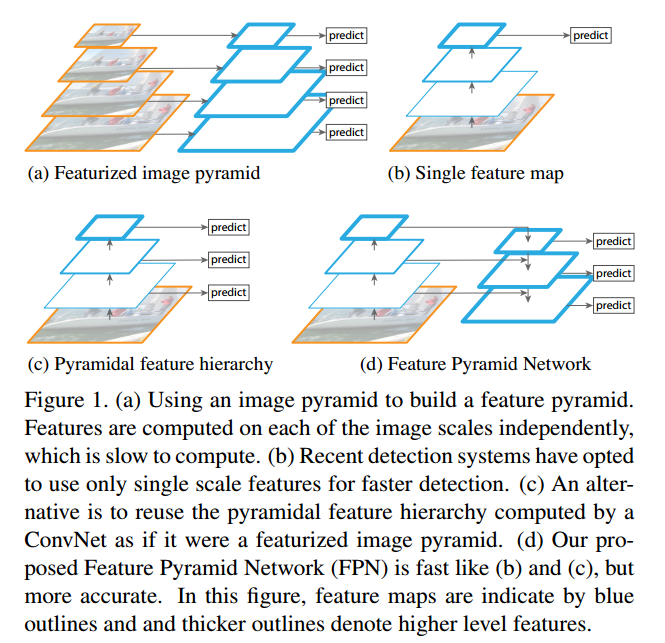
用一张图总结一下。下图中蓝色的轮廓线框起来的就是不同layer输出的feature map。蓝色线越粗,代表其语义信息越强。在(a)中,是将图像做成金字塔,分别跑一个NN来做,这样计算量极大。(b)中是目前Faster RCNN等采用的方法,只在single scale上做。(c)中是直接将各个layer输出的层级feature map自然地看做feature pyramid来做。(d)是本文的方法,不同层级的feature map做了merge,能够使得每个level的语义信息都比较强(注意看蓝色线的粗细)。
我们使用这种名为FPN的技术,不用什么工程上的小花招,就打败了目前COCO上的最好结果。不止detection,FPN也能用在图像分割上(当然,现在我们知道,MaskRCNN中的关键技术之一就是FPN)。
FPN
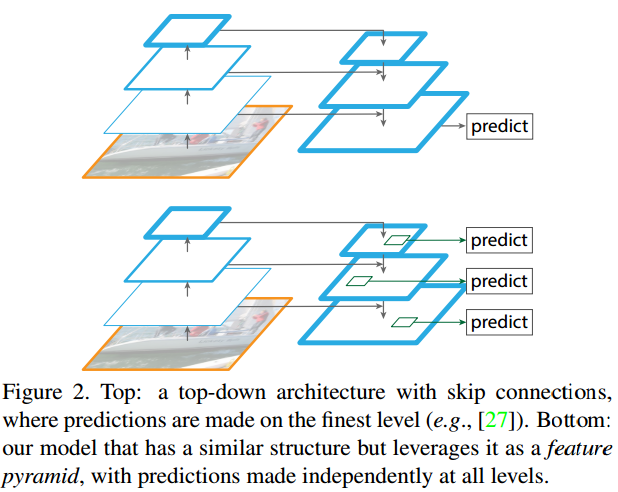
有人可能会想,其实前面的网络有人也做过不同深度layer的merge啊,通过skip connection就可以了。作者指出,那种方法仍然是只能在最终的single scale的output feature map上做,而我们的方法是在all level上完成,如下图所示。
Bottom-up pathway
Bottom-up pathway指的是网络的前向计算部分,会产生一系列scale相差2x的feature map。当然,在这些downsample中间,还会有layer的输出spatial dimension是一致的。那些连续的有着相同spatial dimension输出的layer是一个stage。这样,我们就完成了传统金字塔方法和CNN网络的名词的对应。
以ResNet为例,我们用每个stage中最后一个residual block的输出作为构建金字塔的feature map,也就是C2~C5。它们的步长分别是$4, 8, 16, 32$。我们没用conv1。
Top-down pathway和lateral connection
Top-down pathway是指将深层的有更强语义信息的feature经过upsampling变成higher resolution的过程。然后再与bottom-up得到的feature经过lateral connection(侧边连接)进行增强。
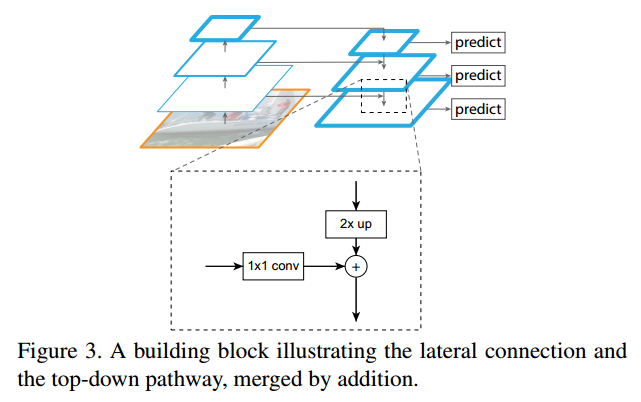
下面这张图展示了做lateral connection的过程。注意在图中,越深的layer位于图的上部。我们以框出来放大的那部分举例子。从更深的层输出的feature经过2x up处理(spatial dimension一致了),从左面来的浅层的feature经过1x1 conv处理(channel dimension一致了),再进行element-wise的相加,得到了该stage最后用于prediction的feature(其实还要经过一个3x3 conv的处理,见下引文)。
一些细节,直接引用:
To start the iteration, we simply attach a 1x1 convolutional layer on C5 to produce the coarsest resolution map. Finally, we append a 3x3 convolution on each merged map to generate the final feature map, which is to reduce the aliasing effect of upsampling.
此外,由于金字塔上的所有feature共享classifier和regressor,要求它们的channel dimension必须一致。本文固定使用$256$。而且这些外的conv layer没有使用非线性激活。
这里给出一个基于PyTorch的FPN的第三方实现kuangliu/pytorch-fpn,可以对照论文捋一遍。1
2
3
4
5
6
7
8
9
10
11
12
13
14
15
16
17
18
19
20
21
22
23
24
25
26
27
28
29
30
31
32
33
34
35
36
37
38
39
40
41
42
43
44
45
46
47
48
49
50
51
52
53
54
55
56
57
58
59
60
61
62
63
64
65
66
67
68
69
70
71
72
73
74
75
76
77
78
79
80
81
82
83
84
85
86
87
88
89
90
91
92
93
94
95
96
97
98
99
100
101
102
103
104
105
106
107
108
109## ResNet的block
class Bottleneck(nn.Module):
expansion = 4
def __init__(self, in_planes, planes, stride=1):
super(Bottleneck, self).__init__()
self.conv1 = nn.Conv2d(in_planes, planes, kernel_size=1, bias=False)
self.bn1 = nn.BatchNorm2d(planes)
self.conv2 = nn.Conv2d(planes, planes, kernel_size=3, stride=stride, padding=1, bias=False)
self.bn2 = nn.BatchNorm2d(planes)
self.conv3 = nn.Conv2d(planes, self.expansion*planes, kernel_size=1, bias=False)
self.bn3 = nn.BatchNorm2d(self.expansion*planes)
self.shortcut = nn.Sequential()
if stride != 1 or in_planes != self.expansion*planes:
self.shortcut = nn.Sequential(
nn.Conv2d(in_planes, self.expansion*planes, kernel_size=1, stride=stride, bias=False),
nn.BatchNorm2d(self.expansion*planes)
)
def forward(self, x):
out = F.relu(self.bn1(self.conv1(x)))
out = F.relu(self.bn2(self.conv2(out)))
out = self.bn3(self.conv3(out))
out += self.shortcut(x)
out = F.relu(out)
return out
class FPN(nn.Module):
def __init__(self, block, num_blocks):
super(FPN, self).__init__()
self.in_planes = 64
self.conv1 = nn.Conv2d(3, 64, kernel_size=7, stride=2, padding=3, bias=False)
self.bn1 = nn.BatchNorm2d(64)
# Bottom-up layers, backbone of the network
self.layer1 = self._make_layer(block, 64, num_blocks[0], stride=1)
self.layer2 = self._make_layer(block, 128, num_blocks[1], stride=2)
self.layer3 = self._make_layer(block, 256, num_blocks[2], stride=2)
self.layer4 = self._make_layer(block, 512, num_blocks[3], stride=2)
# Top layer
# 我们需要在C5后面接一个1x1, 256 conv,得到金字塔最顶端的feature
self.toplayer = nn.Conv2d(2048, 256, kernel_size=1, stride=1, padding=0) # Reduce channels
# Smooth layers
# 这个是上面引文中提到的抗aliasing的3x3卷积
self.smooth1 = nn.Conv2d(256, 256, kernel_size=3, stride=1, padding=1)
self.smooth2 = nn.Conv2d(256, 256, kernel_size=3, stride=1, padding=1)
self.smooth3 = nn.Conv2d(256, 256, kernel_size=3, stride=1, padding=1)
# Lateral layers
# 为了匹配channel dimension引入的1x1卷积
# 注意这些backbone之外的extra conv,输出都是256 channel
self.latlayer1 = nn.Conv2d(1024, 256, kernel_size=1, stride=1, padding=0)
self.latlayer2 = nn.Conv2d( 512, 256, kernel_size=1, stride=1, padding=0)
self.latlayer3 = nn.Conv2d( 256, 256, kernel_size=1, stride=1, padding=0)
def _make_layer(self, block, planes, num_blocks, stride):
strides = [stride] + [1]*(num_blocks-1)
layers = []
for stride in strides:
layers.append(block(self.in_planes, planes, stride))
self.in_planes = planes * block.expansion
return nn.Sequential(*layers)
## FPN的lateral connection部分: upsample以后,element-wise相加
def _upsample_add(self, x, y):
'''Upsample and add two feature maps.
Args:
x: (Variable) top feature map to be upsampled.
y: (Variable) lateral feature map.
Returns:
(Variable) added feature map.
Note in PyTorch, when input size is odd, the upsampled feature map
with `F.upsample(..., scale_factor=2, mode='nearest')`
maybe not equal to the lateral feature map size.
e.g.
original input size: [N,_,15,15] ->
conv2d feature map size: [N,_,8,8] ->
upsampled feature map size: [N,_,16,16]
So we choose bilinear upsample which supports arbitrary output sizes.
'''
_,_,H,W = y.size()
return F.upsample(x, size=(H,W), mode='bilinear') + y
def forward(self, x):
# Bottom-up
c1 = F.relu(self.bn1(self.conv1(x)))
c1 = F.max_pool2d(c1, kernel_size=3, stride=2, padding=1)
c2 = self.layer1(c1)
c3 = self.layer2(c2)
c4 = self.layer3(c3)
c5 = self.layer4(c4)
# Top-down
# P5: 金字塔最顶上的feature
p5 = self.toplayer(c5)
# P4: 上一层 p5 + 侧边来的 c4
# 其余同理
p4 = self._upsample_add(p5, self.latlayer1(c4))
p3 = self._upsample_add(p4, self.latlayer2(c3))
p2 = self._upsample_add(p3, self.latlayer3(c2))
# Smooth
# 输出做一下smooth
p4 = self.smooth1(p4)
p3 = self.smooth2(p3)
p2 = self.smooth3(p2)
return p2, p3, p4, p5
应用
下面作者会把FPN应用到FasterRCNN的两个重要步骤:RPN和Fast RCNN。
FPN加持的RPN
在Faster RCNN中,RPN用来提供ROI的proposal。backbone网络输出的single feature map上接了$3\times 3$大小的卷积核来实现sliding window的功能,后面接两个$1\times 1$的卷积分别用来做objectness的分类和bounding box基于anchor box的回归。我们把最后的classifier和regressor部分叫做head。
使用FPN时,我们在金字塔每层的输出feature map上都接上这样的head结构($3\times 3$的卷积 + two sibling $1\times 1$的卷积)。同时,我们不再使用多尺度的anchor box,而是在每个level上分别使用不同大小的anchor box。具体说,对应于特征金字塔的$5$个level的特征,P2 - P6,anchor box的大小分别是$32^2, 64^2, 128^2, 256^2, 512^2$。不过每层的anchor box仍然要照顾到不同的长宽比例,我们使用了$3$个不同的比例:$1:2, 1:1, 2:1$(和原来一样)。这样,我们一共有$5\times 3 = 15$个anchor box。
训练过程中,我们需要给anchor boxes赋上对应的正负标签。对于那些与ground truth有最大IoU或者与任意一个ground truth的IoU超过$0.7$的anchor boxes,是positive label;那些与所有ground truth的IoU都小于$0.3$的是negtive label。
有一个疑问是head的参数是否要在不同的level上共享。我们试验了共享与不共享两个方法,accuracy是相近的。这也说明不同level之间语义信息是相似的,只是resolution不同。
FPN加持的Fast RCNN
Fast RCNN的原始方法是只在single scale的feature map上做的,要想使用FPN,首先应该解决的问题是前端提供的ROI proposal应该对应到pyramid的哪一个label。由于我们的网络基本都是在ImageNet训练的网络上做transfer learning得到的,我们就以base model在ImageNet上训练时候的输入$224\times 224$作为参考,依据当前ROI和它的大小比例,确定该把这个ROI对应到哪个level。如下所示:
后面接的predictor head我们这里直接连了两个$1024d$的fc layer,再接final classification和regression的部分。同样的,这些参数对于不同level来说是共享的。